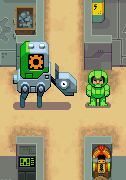
Multiple-Use Labor Element. M.U.L.E. That’s what they call it. A nightmarish, kludgey amalgam of robotic motivators and manipulators designed to accomplish a variety of tasks, and none of them very well.
And now, he’s your only friend out here in the wilderness of Planet Irata. The Federation has sent you and 3 other planeteers to this forsaken place to pave the way for mass colonization. It’s up to all of you to extract, refine, and process the raw materials necessary to bring the colony up to acceptable standards. Of course, it definitely wouldn’t hurt to be the most successful colonist, even if it means shorting your fellow planeteers and profiting off their hardships…but get too greedy and the lot of you will spend the rest of your lives sleeping in a tent, surrounded by nothing but desolate wastes and those $%#*#&$ M.U.L.E.s…
Planet M.U.L.E. is a game of exploration and economic development for 4 players (human and artificial intelligence alike). The standard game takes place over 12 rounds, each lasting a month in game terms. At the end of the game, if the total net worth of all 4 players is $60,000 or more, the player with the most wealth is declared the “First Founder” and wins the game.
Before you start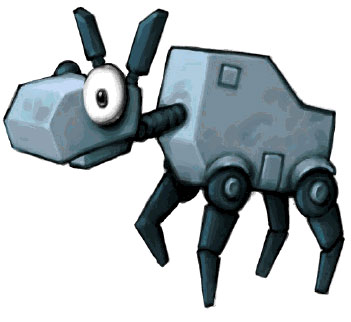
There are some things you need to do before you play your first game of M.U.L.E.:
- DOWNLOAD the latest game client.
- Register a new player account HERE. During registration you choose your game username and password.
- Login to your account here on the website and select a species in your PROFILE.
After you’ve completed the steps above, you can start the game client, login and play with other people.
I. Getting Into A Game
After starting the Planet MULE game client, and logging in with your username and password, you’ll see the Lobby.
Here, you find a list of all the games that are currently being played/assembled, and a list of all of the users that are logged in. At the top, a menubar shows buttons for starting/joining games, toggling sound, and changing your game settings. The bottom half of the window contains a chat room where all logged-in users may communicate.
A game whose Status is Open means it hasn’t started yet, and you can join it (either to play or to spectate) by clicking on the game in the list, and then clicking “Join Game”.
Alternatively, you can set up a new game simply by clicking “New Game”. A dialog will pop up asking you to set the name of the game, the type of game to play, and (optionally) the number of rounds it will entail.
FAQ: What is the difference between a Training Game and a Tournament Game?
A Training Game does not affect your hi-score. That is, your number of won games and win percentage is unaffected. It can also be played over 6 or 9 rounds compared to the standard 12 round game. In that case your required total colony score to win adjusts accordingly. A Training Game can be played solo against 3 AI players, where a Tournament game allows a maximum of 2 AI players.
IMPORTANT NOTE: To count a tournament game as “legally finished”, at least 2 human players must remain in play until the game has finished! While a game is not counted as abandoned if only 1 human player remains in the end, it is also not counted towards a “win” with regards to the hi-score ranking!
Once you’re connected to a game, you can press the J key to join as a player, and A key to add an AI, assuming you’re hosting the game. Each human player must press their action button (Space or Ctrl) to indicate their readiness to play. Once all humans have “buzzed in”, all planeteers board the colony ship and the game begins!
Once you’re connected to a game, you can press the J key to join as a player, and A key to add an AI, assuming you’re hosting the game. Each human player must press their action button (Space or Ctrl) to indicate their readiness to play. Once all humans have “buzzed in”, all planeteers board the colony ship and the game begins!
II. Controls
By default, you control the game with the Arrow Keys and Space Bar.
The Arrow Keys move your avatar while Space Bar is your action button, which makes selections and performs actions.
You can use the Enter key to chat with the other players.
When you’re done chatting you can either click on the main game display or press Escape to resume control of the game.
III. Elements of Play
At the beginning of the game, the Federation colony ship lands in an arbitrary portion of Planet Irata consisting of “plots” of land, arranged in a grid of 5 rows and 9 columns. The center column has a valley running north-south, in which a river flows. The very center of the map is literally the Town Square, where the colony lives and works, and contains various offices, outfitting stores, and the MULE Corral.
To harvest and collect the planet’s resources, you and the other players must purchase MULEs from the Corral, outfit them to collect specific resources, and install them on plots of land.
Most of the plots on the map are flat plainland, but 2 plots on each row are guaranteed to contain mountainous terrain, indicated by 1-3 peaks. Each type of terrain has its own unique qualities which can benefit/inhibit players’ production of resources.
SMITHORE
![]() Smithore is a durable metal used in the production of MULEs. Between game turns, the Store will build an additional MULE for every 2 units of Smithore it has. The Corral has room for up to 14 MULEs.
Smithore is a durable metal used in the production of MULEs. Between game turns, the Store will build an additional MULE for every 2 units of Smithore it has. The Corral has room for up to 14 MULEs.
Smithore is most plentiful in the mountains (the more peaks the better), but there is still some to be found in the plains areas. You cannot mine for Smithore in the river valley due to erosion concerns.
Smithore prices vary between $35 and $260 per unit, but normally average around $50. The price of a MULE will always be 2x the current value of Smithore. The cost to outfit a MULE for Smithore mining is $75.
FOOD
![]() Food is what keeps you nourished; it determines how much time you have to move and perform actions during the game. If you don’t have enough Food to eat, your available time will be reduced considerably.
Food is what keeps you nourished; it determines how much time you have to move and perform actions during the game. If you don’t have enough Food to eat, your available time will be reduced considerably.
Food is best harvested in the river valley (fishing and irrigation), but also has decent returns in the plains. It can be found in small amounts in the mountains.
Food prices vary between $15 and $260 per unit, and usually stay pretty low unless there is a shortage. The cost to outfit a MULE for Food harvesting is $25.
ENERGY
![]() Energy is used and consumed by MULEs to produce/harvest every type of resource except Energy itself. Each MULE that is not producing Energy requires 1 unit of Energy per round in order to operate.
Energy is used and consumed by MULEs to produce/harvest every type of resource except Energy itself. Each MULE that is not producing Energy requires 1 unit of Energy per round in order to operate.
If you do not have enough Energy to power your MULEs in the Production Phase, you will not produce on a random non-Energy-producing plot for each unit of Energy you are short (marked by a dark lightning bolt symbol).
The best place to generate Energy is in the plains where winds are strong and solar exposure is highest. The river valley also provides decent Energy collection (hydrodynamic turbines). Mountains also provide a trickle of Energy, but it’s very inefficient.
Energy prices vary between $10 and $260 per unit, but usually stay bottomed out unless there is a shortage. The cost to outfit a MULE for Energy collection is $50.
CRYSTITE
![]() Crystite is a luxury mineral that has no practical purpose in colonization…but it’s quite rare in the rest of the galaxy! All Crystite that is sold to the Store is immediately shipped off-world, and can’t be bought except from other players.
Crystite is a luxury mineral that has no practical purpose in colonization…but it’s quite rare in the rest of the galaxy! All Crystite that is sold to the Store is immediately shipped off-world, and can’t be bought except from other players.
Consequently, Crystite is also a prime target of theft by piracy.
Crystite deposits are hidden underground, so there’s no obvious indicator of where to find the best places to mine it. There are guaranteed to be 4 high-density “blooms” of Crystite underground, which start at random but specific places, and spread out in a circular pattern. The threat of erosion still prevents MULEs from mining in the river valley, but all other terrain may contain mineable deposits. Meteors from space tend to have a very high quantity of Crystite as well, if you happen to be the unfortunate(?) victim of one!
Crystite prices are not governed by the local laws of supply and demand; it varies in price between $48 and $148 each round, and you can never predict how the price will change between rounds. It costs $100 to outfit a MULE for Crystite mining.
After the colony ship lands, the town Store is stocked with 14 MULEs, 8 Smithore, 8 Food, and 8 Energy. Each player is also given a starting stake of 2 Energy, 4 Food, and $1000 in cash. Good luck to everyone!
Each round of the game consists of 5 distinct phases:
- Land Grant/Auctions
- Development
- Production
- Auction
- Summary
IV. Phases
1. Land Grant
The Land Grant Phase is your chance to claim one free plot of land each round. A black, square cursor will start to pass over the entire map, left to right, and top to bottom. When the cursor is over the plot of land you wish to claim, press the button as quickly as possible! If you are successful, the plot of land will be bordered by a frame in your color.
If multiple players select the same plot at the same time (within approximately a tenth of a second), the player furthest behind in score will get the plot, and the others will have to settle for a plot in another location. Keep this in mind!
The difference between plots is explained under section 3. Production.
LAND AUCTIONS
Sometimes, after the Land Grant Phase is over, the colony will auction off 1 or more additional plots of land. If this happens, you’ll be in a bidding war with your opponents. To raise your bid, simply push UP to walk your price line towards the top of the display; you’ll see your price listed. Push DOWN to lower your bid; you can even back out of the auction entirely by moving to the bottom of the screen. When the time-bar runs out, whoever has the highest bid will purchase the plot. If no one has bid on the plot, the land goes unsold.
FAQ: The minimum bid is above what I can afford. What determines the minimum bid?
The first auctioned plot in the game has a minimum bid of $160. After this, the minimum bid changes to reflect the average price per plot of land sold previously, slightly discounted.
FAQ: Someone with more money than me raised the minimum price to beyond what I can afford, and then moved back down below the minimum price…why can I not bid on it?
This is actually part of the original game, in which a player with a substantial cash lead can “lock-out” other players from purchasing a plot. (There is a similar functionality in other parts of the game.)
FAQ: How much should I pay for land? How much is it worth?
The game considers land to be worth $500 per plot, plus the value of whatever type of MULE is installed on it. At the beginning it’s common to see the auction price even reach $1000. Just be prepared to use that land effectively to make that difference back in the end!
Quote from Dan Bunten
Multiply the number of rounds you have left by 100, and add 500; this will give you the maximum bid you should make on any piece of property. In other words, bid high for land early in the game, but don’t get sucked into a bidding war later in the game just because you have lots of money. If you want to get really sophisticated, figure out what you will produce on that piece of land, how many units you will be able to produce, and how much it will sell for. Multiply that by the number of rounds left and add it to 500.
Click HERE for an interesting and more in-depth discussion about the value of land, and why you should pay attention in Land Auctions.
2. Development
Once Land Grants and Land Auctions have finished, each player will get a chance to install MULEs on their owned plots, and perform other duties related to developing the colony.
Normally, the players take their Development turns in score order, with the leader going first. This gives players that are a behind a chance to see what others do first, so they can react accordingly.
However, if there are less than 8 MULEs in the Corral, the order of turns is reversed, so that the players in last place go first; this is so they can be assured of having the chance to buy MULEs from the Corral.
DID YOU REMEMBER TO EAT
If you have enough Food to eat for this round, you will receive 45 seconds of time with which to run your errands. If you have eaten less, you’ll receive a proportional amount of time based on what Food you have (2/3, 3/4, etc). If you have no Food, you’ll have about 4.5 seconds of time – enough to run into the Pub and snag some chips!
Your remaining time is shown as a colored bar on the right side of the screen.
PERSONAL EVENTS
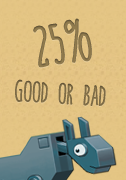
Strange things happen to planeteers on Irata; about 25% of the time, approximately. Sometimes it’s good and gives you extra money, goods, or land; other times it is bad and will cost you those things. What’s important is that each event only happens once per game, good events never happen to the leader, and bad events never happen to the players in 3rd and 4th place. So there’s a silver lining to being behind, and a risk you run by being ahead (known affectionately as the “1st Place Curse”).
Regardless of whether or not an event has befallen you, a countdown timer will prepare you to begin your turn; once it reaches zero, better get a move-on!
THE TOWN
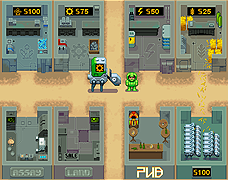
You start your Development turn in the center of town. Across the top are four outfitting kiosks which you use to configure your MULE to collect/harvest a particular resource. Along the bottom, from left to right, are the Assay Office, the Land Sale Office, the Pub, and the MULE Corral.
INSTALLING A MULE
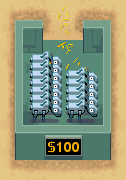
To install a MULE, you’ll first need to buy one. Walk into the Corral (lower-right) until you hear the cashier chime. Then, take the MULE to one of the four outfitting kiosks (in order from left to right: Crystite, Smithore, Energy, Food), walking up until you hear the same chime. It takes a few seconds for the outfitting to complete; once it is done, you’ll see a package on the MULE’s back, with the icon of the resource he’s now outfitted to collect.
Lead him out of town through one of the 4 exits, and walk him to one of your plots. Be careful not to move through mountain areas or the river valley unnecessarily, as they will slow you down.
Once you are within the border of the plot you want to install the MULE on, press the action button to install the MULE. A small building now appears to indicate there is an installed MULE on that plot (each type of resource is represented by a different building). You’ll also see a number of resource icons that show that plot’s Base Production Value (BPV) for that resource. The only exception to this is Crystite; you don’t get to see its BPV until actual production is performed.
Be careful not to press the button too early, or when you’re not on a plot you own – MULEs love the taste of freedom and will take any opportunity to flee from your grasp!
REFITTING/EXCHANGING/SELLING MULES
Later on in the game, you may decide to change what resource a MULE collects. To do so, go out to the plot where the MULE is installed, and press the action button to pick him up. Take him back to the town and walk into the desired outfitter. If the cost to refit is greater than the original outfitting cost, you’ll only pay the difference; if it is less, you’ll be refunded for that same difference. Simply take the MULE back out to the plot to install him again.
You can also exchange a MULE you’re carrying with one that is installed, by pressing the action button on the plot with a MULE, while leading a MULE yourself; the two will switch places, and you’ll now have the previously-installed MULE in tow.
If you feel the need to sell a MULE, simply take him back to the Corral – you’ll get back some cash, plus the outfitting cost.
DOING AN ASSAY
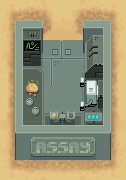
To find out the BPV of Crystite for a plot, you can install a Crystite MULE on it and take your chances, or you can do an assay first.
By walking into the Assay Office, you can pick up a free sampling droid which you can take out to ANY plot (even those owned by other players), and activate with the action button to get an estimate of the Crystite density underneath that plot. While all players briefly get to see the results of the assay, you alone will continue to see a small flag on that plot showing the BPV of Crystite there.
SELLING LAND
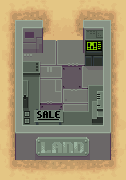
If you need to sell some of your land, walk into the Land Sale Office. You’ll then be given a flag to go out and mark your plot with. You can do this multiple times, if you wish, and any land you mark for sale will be auctioned off in the following round.
GAMBLING AT THE PUB
Everyone knows that the Pub’s gambling games are woefully easy to win, but their drinks are pretty strong. Once you enter the Pub, you’re guaranteed to win some money, but you also end your turn. However, the more time you have left when you go to the Pub, the more money you’re likely to win.
HUNTING THE WAMPUS

The elusive Mountain Wampus lives in caves dug into the sides of Irata’s mountains, and is known to have a hoard of riches. If you watch and listen closely, you’ll hear him squeak, and you might catch a glimpse of his peculiar face from time to time. To catch the Wampus, you have to be outside of town, without a MULE. Then, when you see his face, run over and jump on him with the action button! (He doesn’t have to be visible, but he can’t have re-appeared somewhere else in the meantime). The Wampus is easily extorted from, to be left alone; the further along in the game you are, the more money he pays out.
The elusive Wampus is a shy animal, which could never stand to live mere feet away from loud, smoke-belching smithore-mining equipment. Once you move in, he moves out to find someplace more quiet!
3. Production
Once all players have had their Development turn, you get to see how the MULEs do at collecting resources. You can watch the process slowly as the units appear one by one in each plot, or you can skip to the end by having all players press the action button.
WHAT AFFECTS PRODUCTION? 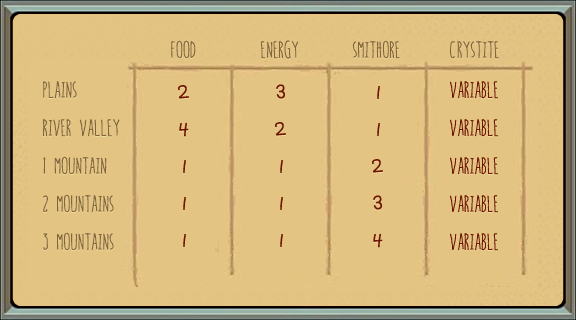
Terrain Type: Certain resources are easier to extract from certain land types. The amount in the table is called the Base Production Value (BPV), and is shown as a number of resource icons when you install a MULE.
Having Enough Energy: As long as you have 1 Energy for each non-Energy MULE you have installed, you won’t be at risk of underpowering; if that happens, a random MULE will not produce for each Energy unit you are short.
Economies of Scale (EOS): The bigger your factories are, the cheaper they are to run, due to innovations like mass production and bulk discounts on materials and machine tools. In MULE, you receive this benefit by having MULEs collecting the same resource on adjacent plots. Each MULE that meets this requirement provides an extra unit of production to that plot.
FAQ: Does EOS apply if an opponent is collecting the same resource adjacent to me?
You must own all plots involved in order to receive the EOS bonus.
FAQ: If I have two adjacent plots producing the same resource as the one in question, do I get two extra?
Each plot only gets one unit of EOS bonus, and only if it has at least one adjacent plot producing the same resource.
Learning Curve Theory (LCT): In the long-run, the more you produce of a resource, the more efficient you are at doing so (which is why computer components get faster and cost less every year). In MULE, you get an extra unit on each plot for every 3 plots you have producing the same resource (so 6 plots = 2 extra units, and so on). This bonus stacks with the EOS bonus, as well.
As an example, if you have a total of 3 plots mining Smithore and two of them are adjacent to each other (the other one by itself), each mine would produce one extra unit for the LCT bonus, and the two adjacent plots would each produce a second extra unit for the EOS effect, for a total of 5 extra units.
Random Variation: Even after all of the above have been factored in, there still is a randomness that applies to a plot’s production each round. Each MULE’s output varies naturally between -3 and +3. This means that plots with low base production values will occasionally produce no units.
Global Events: With the exception of the last round, each Production Phase is guaranteed to have a random event which can drastically affect the map, the Store, or one of the players. Some events occur prior to production, and some occur afterwards. No event can happen more than three times, and those that do happen are less likely to happen with each occurrence. Also beware the “1st Place Curse”; if a bad global event targets a single player, it will affect either the 1st or 2nd place player.
| Global Event | Occurrences | Description |
| Planetary Pest | 3 | Bugs eat all food at a plot with at least 1 unit of production owned by the 1st or 2nd player. |
| Space Pirates | 2 | Players lose all their crystite units and production. |
| Acid Rain Storm | 3 | Increases all food production but decreases all energy production. |
| Planetquake | 3 | All smithore and crystite production is halved. A mountain can potentially move as well, thus destroying the MULEs on the affected plots. |
| Sunspot Activity | 3 | Increases all energy production. |
| Meteorite Strike | 2 | A meteorite lands on a random plot (destroying the MULE, if any) and creates a very high crystite deposit. |
| Radiation | 2 | Causes a MULE to go crazy and run away from one of the the 1st or 2nd players’ developed plots. |
| Fire in Store | 2 | The whole stock in the store is lost. |
4. Auction
After the production, players get to sell or buy goods in the auctions.
There are four auctions, one for each type of good.
At the beginning of each auction usage and spoilage is subtracted from your initial amount, then the goods from the production are collected and added to your sum. Food and Energy spoil if you keep too much between rounds. Food more so than Energy. Smithore and Crystite have a limit of 50 units per round per player, so any excess above 50 that is kept during rounds will show as “spoilage” in the auction phase.
An auction is automatically skipped if there are no goods available for trade by neither players, nor the store.
Before an auction starts, each player decides if he or she wants to be buying or selling goods. Note that you only have a limited time to choose.
When the auction starts you move your character up or down to increase or decrease the buy or sell bid.
If two players meet at the same price, the seller begins to transfer items for that price to the buyer until either the seller has run dry, the buyer runs out of money or anyone retreats from the line.
Notice that during movement or trading, the timer is slowed. When the timer bar is empty the auction is over.
Below your player is a monitor which shows your surplus or shortage. If it’s negative you have less units than needed of that resource. If it’s positive you can sell units and still have enough for your usage next round. Typically a player would sell or buy until the value becomes zero.
Prices
The price of goods varies from round to round with supply and demand. If the supply is smaller than the actual demand the prices tend to up, or the other way around, if supply is more than sufficient the price will fall.
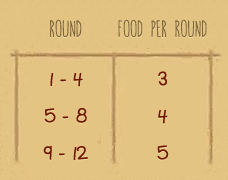
The supply of Food is the number of units possessed by all players and the store. The demand is the number of units that will be eaten by all players in the following round. In the table below you can see the Food needed in every round.
For example if all four players and the store has a total of 16 Food at round 8, the price will rise, since the next round requires a total of 20 Food.
The supply of Energy is the number of units possessed by all players and the store. The demand is the number of units that will be used by all factories in the next round, plus the number of players, because we expect all players to build at least one more factory the next round.
The price of Smithore is tied to the number of M.U.L.E.s. Smithore is used by the store at the end of each round to build M.U.L.E.s. The supply is thus the number of M.U.L.E.s available in the store. The demand is the number of unexploited player plots. Those which need a mule to start production. Here we also add the number of players since we expect all players to get at least one other plot and M.U.L.E. the next round.
Since the store needs 2 Smithore to build 1 M.U.L.E., so the corral will only be replenished if players sell Smithore to the store.
Crystite isn’t useful to the colony, but it’s a shiny, precious stone that is sought by the rest of the galaxy. The price isn’t affected by the laws of supply and demand, but varies each month between $48 and $148.
5. Summary
This phase shows the actual ranking, which is calculated by the total value of your assets and money. The score of your assets is the current market value of all the goods you possess together with the value of all your factories.
The Colony Total shown at the bottom is the sum of all player’s scores. This is the basis for the overall colony ranking at the end of the game. The game ends and presents a winner in the summary of the last round.
The player rank is updated only after the summary where the player with the most points takes the lead. It can be a good strategy to avoid being first at the beginning of the game. It decreases the risk of suffering bad events.
V. Final Word
This is all you need to know to play Planet M.U.L.E. If you have any questions please make a post in our forum.
Good luck and have fun!